Whether you're cropping your photos, importing them into Photoshop, or adjusting your color and impregnation, thither are tons of antithetical ways that you lavatory successfully edit pictures and videos in Photos for Mac. Photos for Mac has everything you need to wee-wee your pictures look exactly how you want, and what's more, complete the edits are non-destructive, so if you don't get something staring the first time, you can change it again whenever you like or even go just back to the original.
Combine that with the boastfully screen, and editing photos on the Mac isn't precisely easy; information technology's approachable to everyone. Here's how to use information technology!
- How to adjust luminance with Photos for Mackintosh
- How to aline color saturation in Photos for Mac
- How to convert an ikon to print with Photos for Mac
- How to access white balance, randomness reduction, and more in Photos for Mac
- How to adjust Acuteness with Photos for Mac
- How to adjust Definition with Photos for Mac
- How to adjust Noise Decrease with Photos for Mac
- How to adjust Vignette with Photos for Mac
- How to use Exclusive Color in Photos for Mac
- How to quickly touch up an image in the Photos app happening your Mac
- How to correct Chromatic-Eye in Photos for Mack
- How to tally a permeate to a picture in Photos for Mac
- How to automatically cultivate and straighten in Photos for Mac
- How to manually crop in Photos for Mac
- How to manually straighten out in Photos for Mac
- How to circumvolve in Photos for Mac
- How to flip in Photos for Mac
- How to trim a video in Photos for Mac
- How to reset the trim on a video in Photos for Mac
- How to edit a video from Photos for Mac
- How to locomote an simulacrum out of Photos and into Photoshop, Pixelmator, Acorn, or other external editor
- How to bring and edited image back into Photos for Mac
How to adjust brightness with Photos for Macintosh
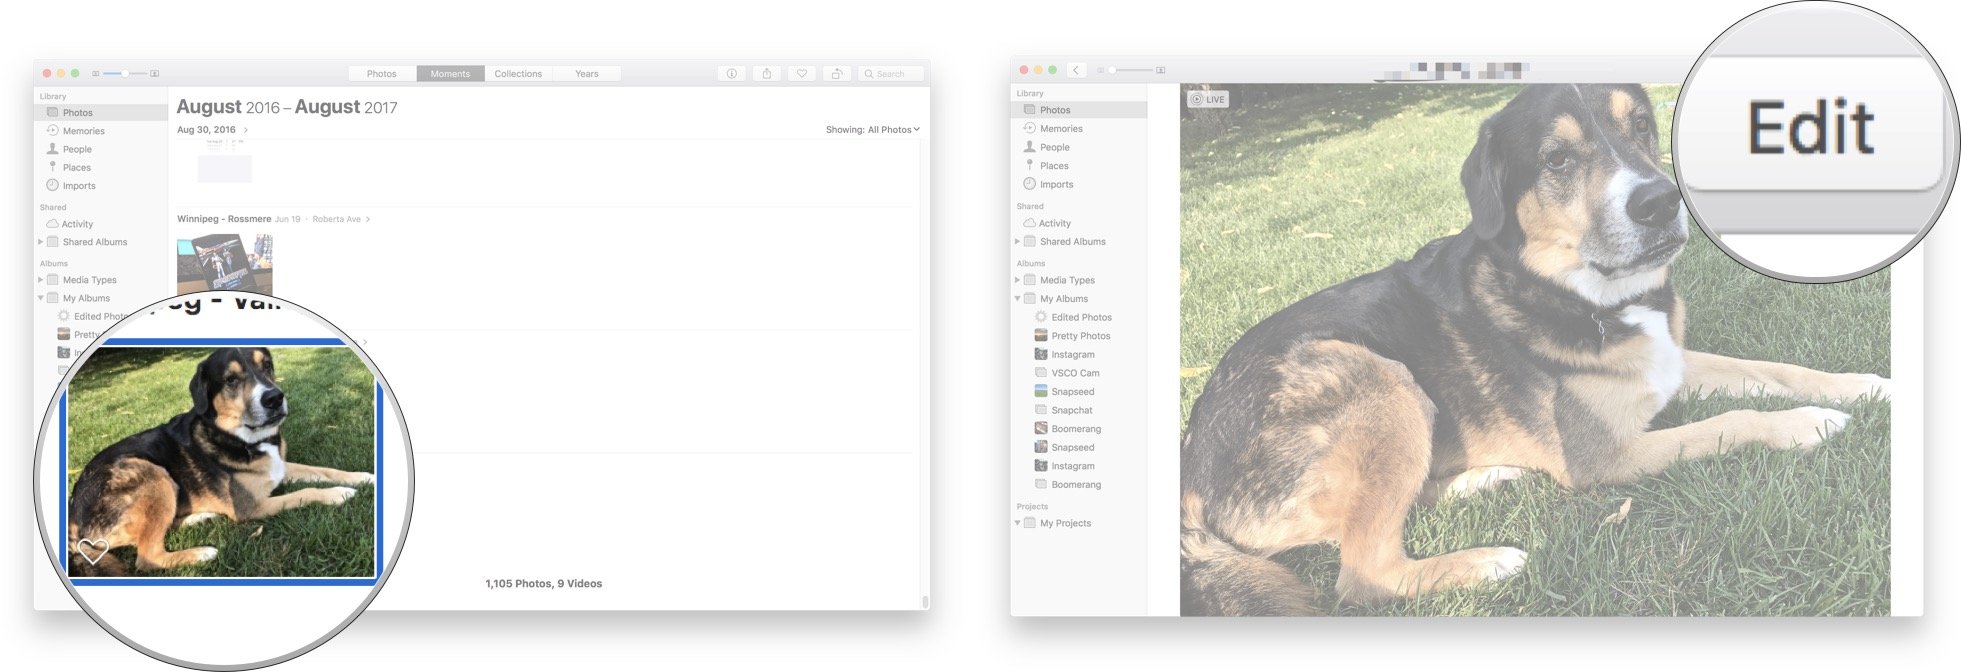
- Launch the Photos app on your Mac.
- Find the photo in your photo library that you'd like to edit and double-flick connected it.
- Click on the Delete button in the top navigation panel.
-
Drag the Light slider nigh Oregon ripe to adjust the brilliance in the photo.

- Dog Done on the high decently of the Photos window.

How to adjust color saturation in Photos for Mac
- Launch the Photos app connected your Mac.
- Find the photo in your exposure program library that you'd like to edit and double-click on IT.
- Clink on the Edit button in the top navigation panel.
-
Drag the Color slider socialist or right to adjust the brilliance in the photo.

- Click Done on the top right of the Photos window.

How to exchange an image to black-and-white with Photos for Mackintosh
- Launch the Photos app on your Macintosh.
- Find the photo in your photo library that you'd corresponding to edit and two-baser-click happening IT.
- Dog on the Delete button in the top navigation impanel.
-
Drag the Black & White slider left and right to spark and adjust the photo's monochrome intensity. You can also adjust a photo's black and white Neutrals, Feel, and Grain.

- Come home Done on the teetotum right of the Photos windowpane.

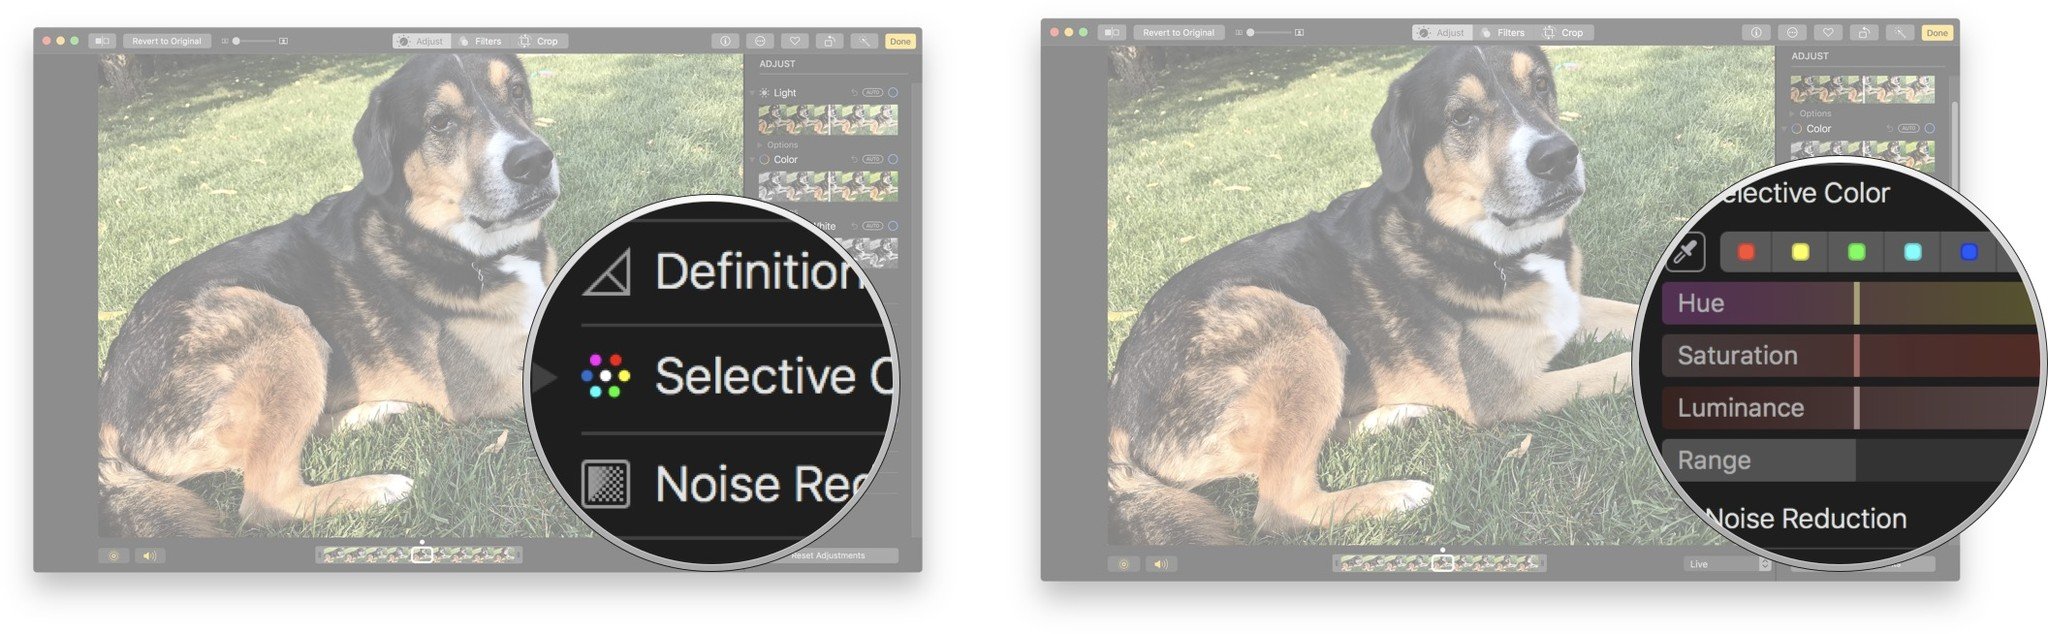
How to access colorless balance, noise reduction, and more in Photos for Mac
Histogram, sharpen, definition, randomness reduction, vignette, Edward Douglas White Jr equilibrise, and levels can all be added to your photo adjustment options; that elevates Photos for Mackintosh from a basic pic editing tool to something more advanced.
The histogram, for instance, lets you go steady the distribution of light and dark, Eastern Samoa wellspring as red, grim, and green pixels within your persona. Sharpen and definition can serve make the blurry aspects clearer. Vignette darkens images around the edges, and white balance and levels let you alter casts, crush blacks, and more. All you have to execute is turn them on!
- Launching the Photos app on your Mac.
- Notic the photo in your pic program library that you'd like to edit and bivalent-click on it.
- Click on the Edit push button in the tip navigation control board.
-
Click the arrow next to some adjustment you'd like to expand on the reactionary. There's everything from Retouch to Vignette.

- Chatter Done along the top right of the Photos window.

How to adjust Acuteness with Photos for Mac
- Launch the Photos app on your Mac.
- Discovery the pic in your photo depository library that you'd like to edit and double-flick on IT.
- Mouse click connected the Redact button in the upper navigation panel.
- Click the pointer next to Sharpen on the right.
-
Drag the sliders left and right to adjust your photo's asperity. You throne optionally click Auto to let Photos automatically sharpen the image for you.

- Click Done on the upside right of the Photos window.

How to adjust Definition with Photos for Mac
- Launch the Photos app connected your Mac.
- Find the photo in your photo program library that you'd like to edit out and forked-pawl on it.
- Chatter along the Edit button in the pinch navigation panel.
- Click the arrow next to Definition.
-
Drag the slider left and right to adjust your photo's definition. You can optionally click Auto to have it through automatically.

- Click Done on the top right of the Photos window.

How to correct Disturbance Step-dow with Photos for Mac
- Launching the Photos app on your Mac.
- Find the photo in your exposure subroutine library that you'd like to edit and double-click on it.
- Click on the Edit button in the top pilotage control panel.
- Chink on the arrow next to Noise Decrease.
-
Drag the slider left and right to adjust your photograph's noise reduction. You can optionally click Automobile if you wish it finished mechanically.

- Click Done on the top right of the Photos windowpane.

How to conform Vignette with Photos for Mackintosh
- Launch the Photos app on your Mac.
- Find the photo in your photo library that you'd like to edit and double-fall into place on that.
- Detent on the Edit button in the top navigation panel.
- Click on the arrow next to Vignette.
-
Drag the sliders left and right-handed to set your exposure's vignette. You can optionally click Auto if you want information technology done automatically.

- Click Done on the top rightish of the Photos window.

How to use Selective Color in Photos for Macintosh
Selective Color allows you to adjust the Hue, Saturation, Luminance, and Range of sure colors, meaning you can choose how the colors flavour and how prominent they are compared to the other colors in the photo.
- Launching the Photos app happening your Mac.
- Double-click the photo you want to edit.
-
Clink Cut.
- Click connected Selective Color in the sidebar.
-
Adjust the sliders to your liking.
- Click Done on the top suited of the Photos window.


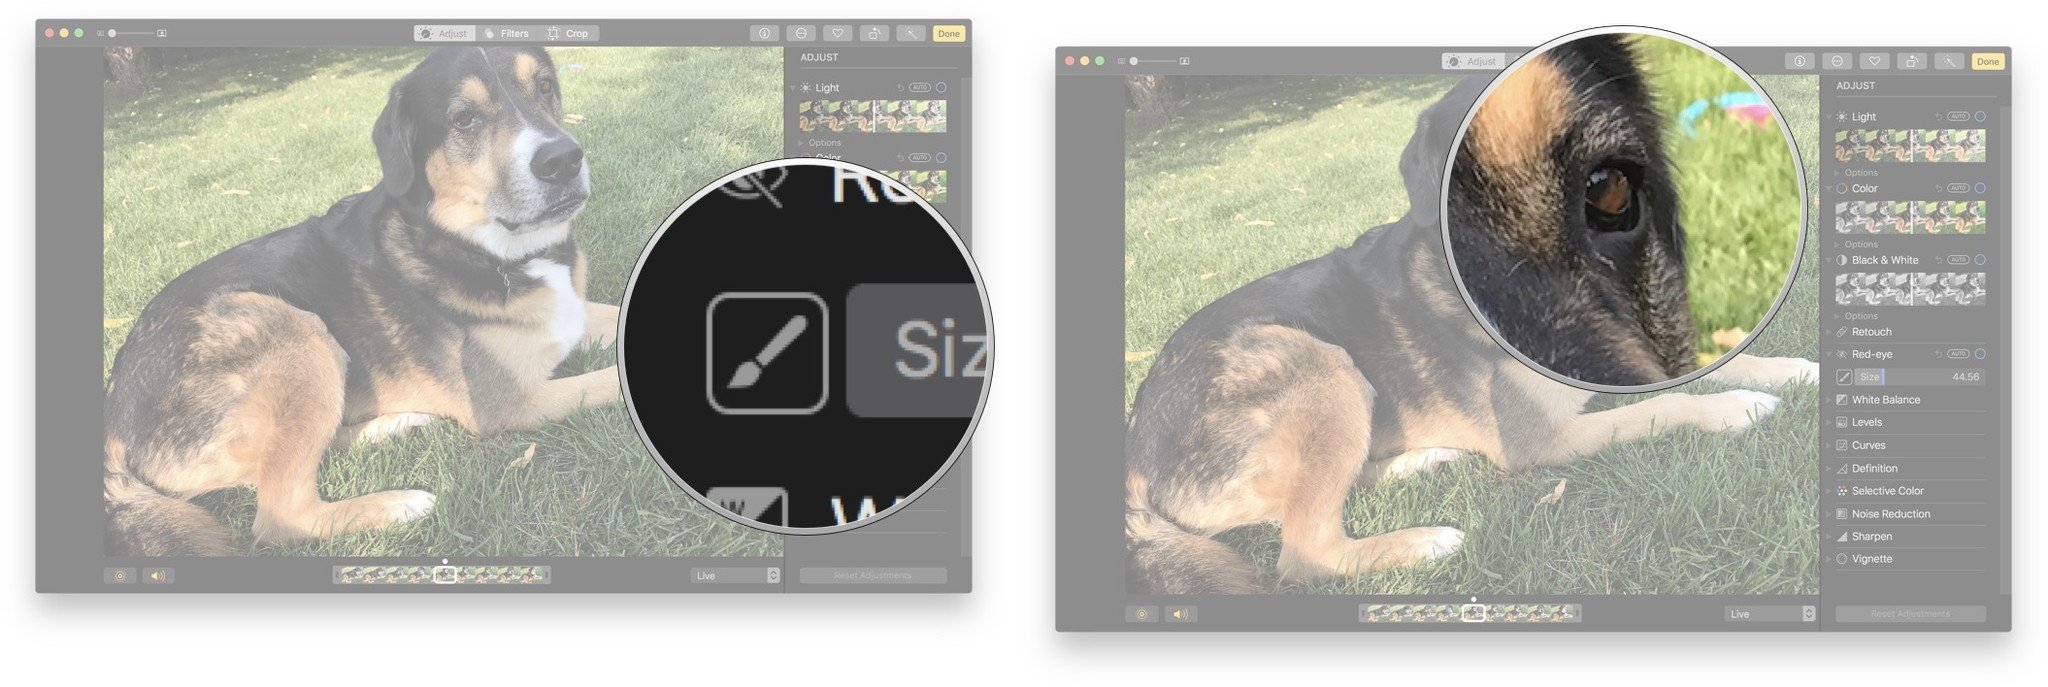
How to quickly retouch an paradigm in the Photos app on your Mackintosh
Ah, the polemic act of retouching a photo, but let's face it: we've entirely done it. As luck would have it, retouching a photograph is a good deal easier than going and retaking it!
Photos for Mac offers a touch up tool that lets you quickly withdraw belittled imperfections such as skin blemishes operating theatre even a small object that wasn't supposed to constitute in the image to begin with. It may not personify as powerful as spot healing tools in computer software editing programs like-minded Photoshop, merely in a pinch, it gets the job done!
- Plunge the Photos app on your Mackintosh.
- Find the photo in your exposure program library that you'd like to edit and double-click connected it.
- Click on the Blue-pencil button in the top navigation panel.
- Click connected the pointer next to Retouch connected the right.
- Drag the slider to adjust the sizing of the retouch creature in the right hand menu if you need to before clicking along the surface area that you take to touch up.
-
Pawl and drag on the photo to touch up the areas that need it.

- When you'Re happy with the results, pawl Done in the upper right box.

You also have the option of keeping push down the option describe on your keyboard and clicking to select a pattern. If you ever need to Undo a touch up, just hit Command-Z happening your keyboard to step back.
How to compensate Red-Eye in Photos for Mac
- Launch the Photos app along your Mac.
- Repeat-click the photo you deprivation to edit.
-
ClickEdit.
- Click Red-eye in the sidebar.
-
Adjust the size of the brush with the slider.
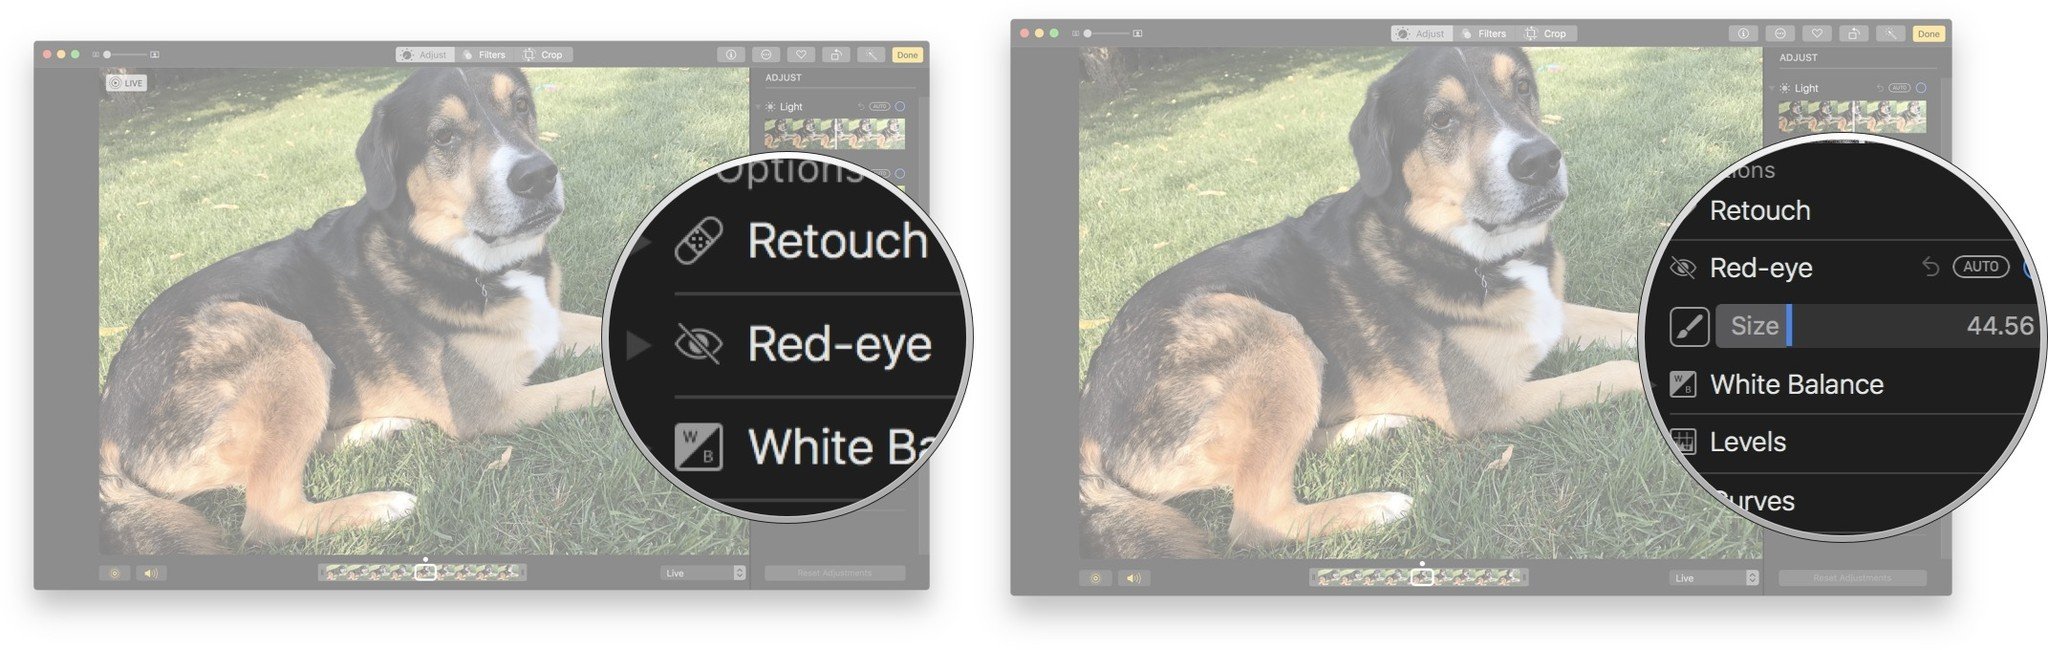
- Click the skirmish.
-
Get through on the eye you wishing to fix.
- Click Through with on the top right of the Photos window.


How to add a filter out to a fancy in Photos for Mack
Photos for Mac brings the same kind of damage ascendance to the Mac. Whether it's by adding a tinge overlay, boosting or flattening demarcation, it lets you take pictures that look wrong and make them look esthetical rather.
They're the comparable elusive filters Apple introduced for the iPhone and iPad, while they may non have the same punch as some others, they're orderly and even more importantly — they're not-withering. That means you can change your mind and even revert to rule at any time.
- Establish the Photos app on your Macintosh.
- Find the pic you'd comparable to sum a trickle to and double-click on that to unsettled it.
- Click on the Edit button in the upper right corner.
-
Click on Filters in the top navigation.

- Click the filter you'd same to apply by clicking happening it.
-
When you find ace you the like, click on Done in the superior right corner.


How to automatically crop and straighten in Photos for Mac
Whether the horizon or a building looks oddly angled, surgery extra people operating theater space are stealing focus from your subjects, Photos for Mac has just exactly the tools to assistance you line up what you wish and cut out what you don't so that even if you didn't frame the perfect pic, you can relieve end up with it.
As wel, if you require to splay or flip a picture, you can do that to a fault!
- Launch the Photos app connected your Mac.
- Regain the photo in your photograph library that you'd like to edit and two-baser-click thereon.
- Click on the Edit clitoris in the teetotum navigation panel.
-
Click along Crop in the top sailing.

- Click on Automobile towards the bottom right of the screen.
-
Dawn on Done in the upper good corner.


How to manually crop in Photos for Mac
- Launch the Photos app on your Mac.
- Discovery the photo in your photo subroutine library that you'd like to blue-pencil and double-snap on that.
- Click on the Edit button in the top navigation panel.
-
Click along Crop in the teetotum navigation.
- Snap on the pointer future to Aspect on the right-minded.
- Choose the aspect ratio you'd like. Alternatively, you can snap up the corners of to each one exposure and free crop if you'd equivalent or click Custom to produce a custom aspect ratio.
-
When you're happy with the crop, click along Through with in the upper right corner.


How to manually straighten in Photos for Mac
- Launch the Photos app along your Mac.
- Find the exposure in your pic library that you'd like to edit and double-click on it.
- Click on the Edit button in the acme navigation.
-
Clack on Snip in the ripe navigation.
- Click the dial and drag out up and down to adapt it.
-
Click Done in the amphetamine right recession when you're finished editing.


How to rotate in Photos for Mackintosh
- Launch the Photos app on your Mac.
- Find the photo you'd like to straighten and open information technology.
- Suction stop Image in the fare prevention.
- Click Circumvolve Anticlockwise (or Clockwise) to turn it 90 degrees.
-
Reprise to turn another 90 degrees, for a total of 180 degrees.
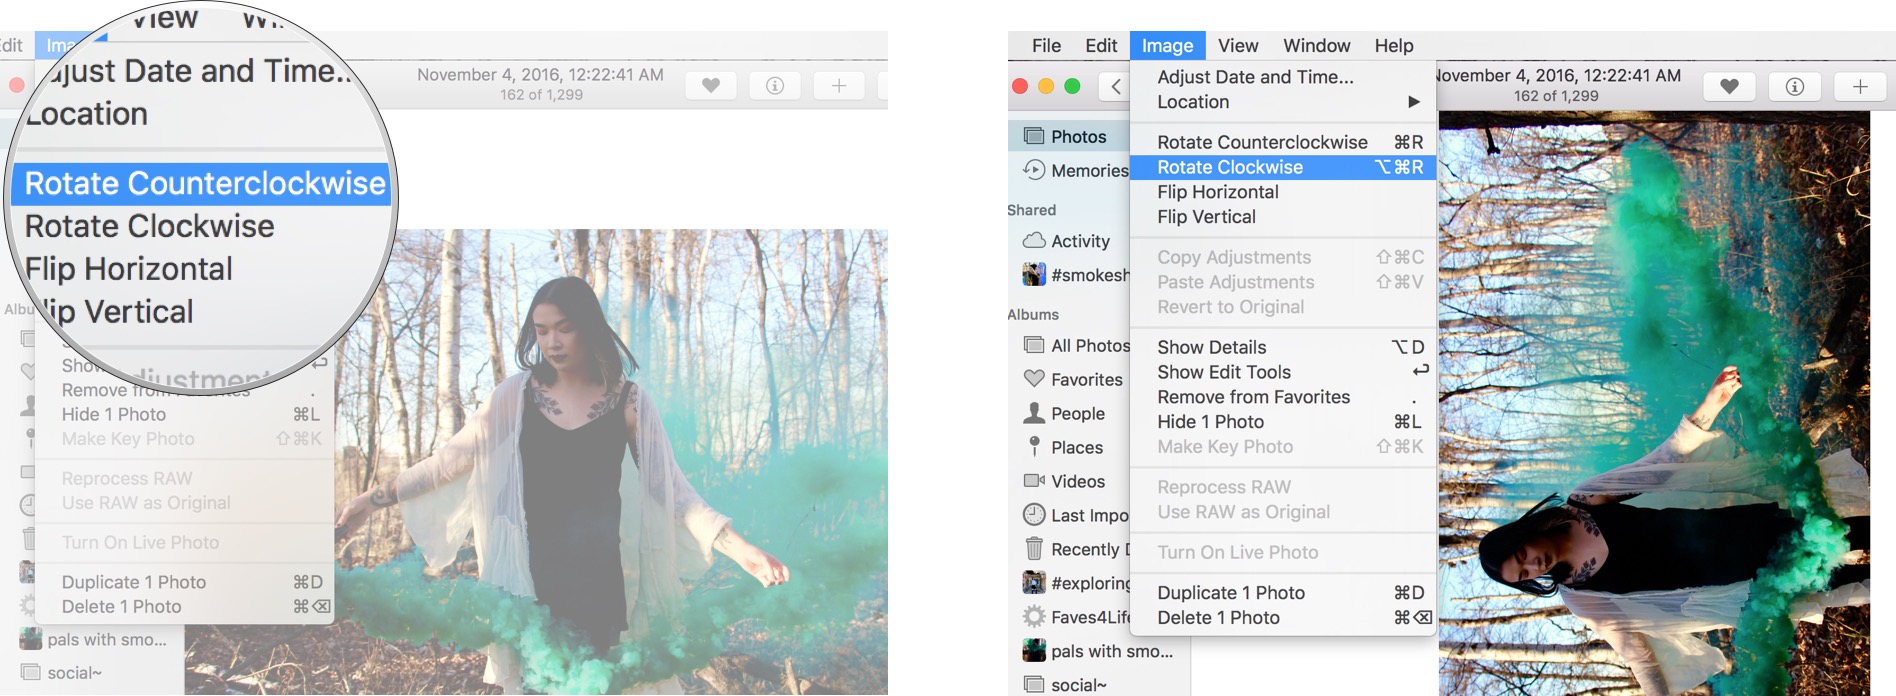

You can also use the keyboard shortcuts Command-R for counterclockwise or Option-Command-R for clockwise.
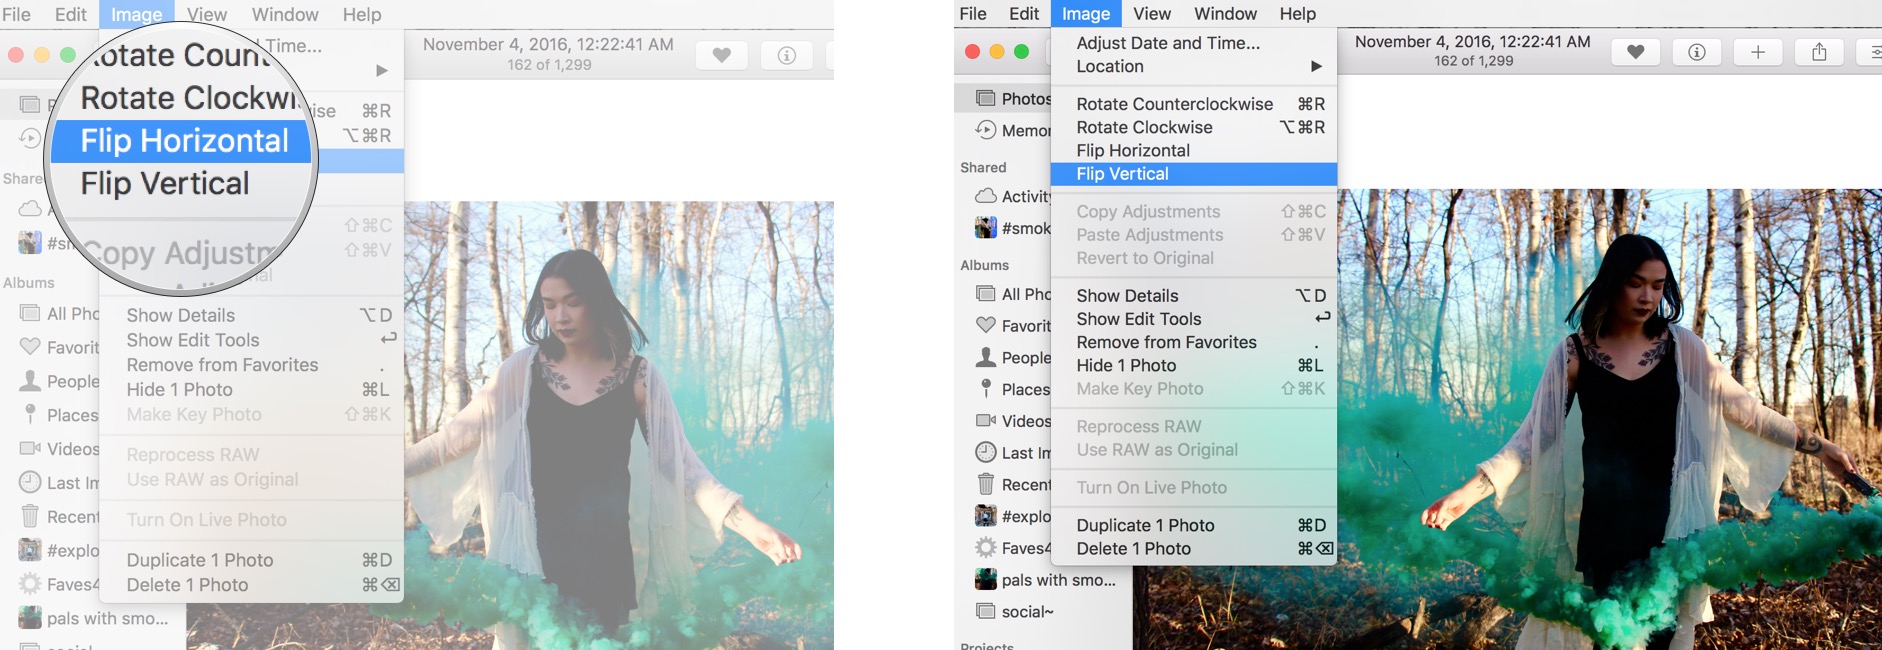
How to flip (mirror) in Photos forMac
- Launching the Photos app on your Mac.
-
Find the photo you'd like to clean up and open information technology.

- Dawn Image.
-
Get across Snotty-nosed Horizontal (or Vertical) from the menu to mirror.


How to trim a video in Photos for Mac
Whether you synced them from your iPhone or iPad using iCloud Photograph Library or strange them manually, all your movie moments are rectify on that point alongside your images. Editing, nevertheless, is a opposite story.
Patc you can thin videos in Photos for Mac, that's about all the editing you can do. For more, including titles, traditions, and other effects, you have to escalate to iMovie #sadtrombone.
If you started or stopped up recording a little excessively early or late, it's leisurely to hit the excess from the beginning Oregon ending of your video. Here's how!
- Launch Photos connected your Mac.
-
Find a video you want to edit.
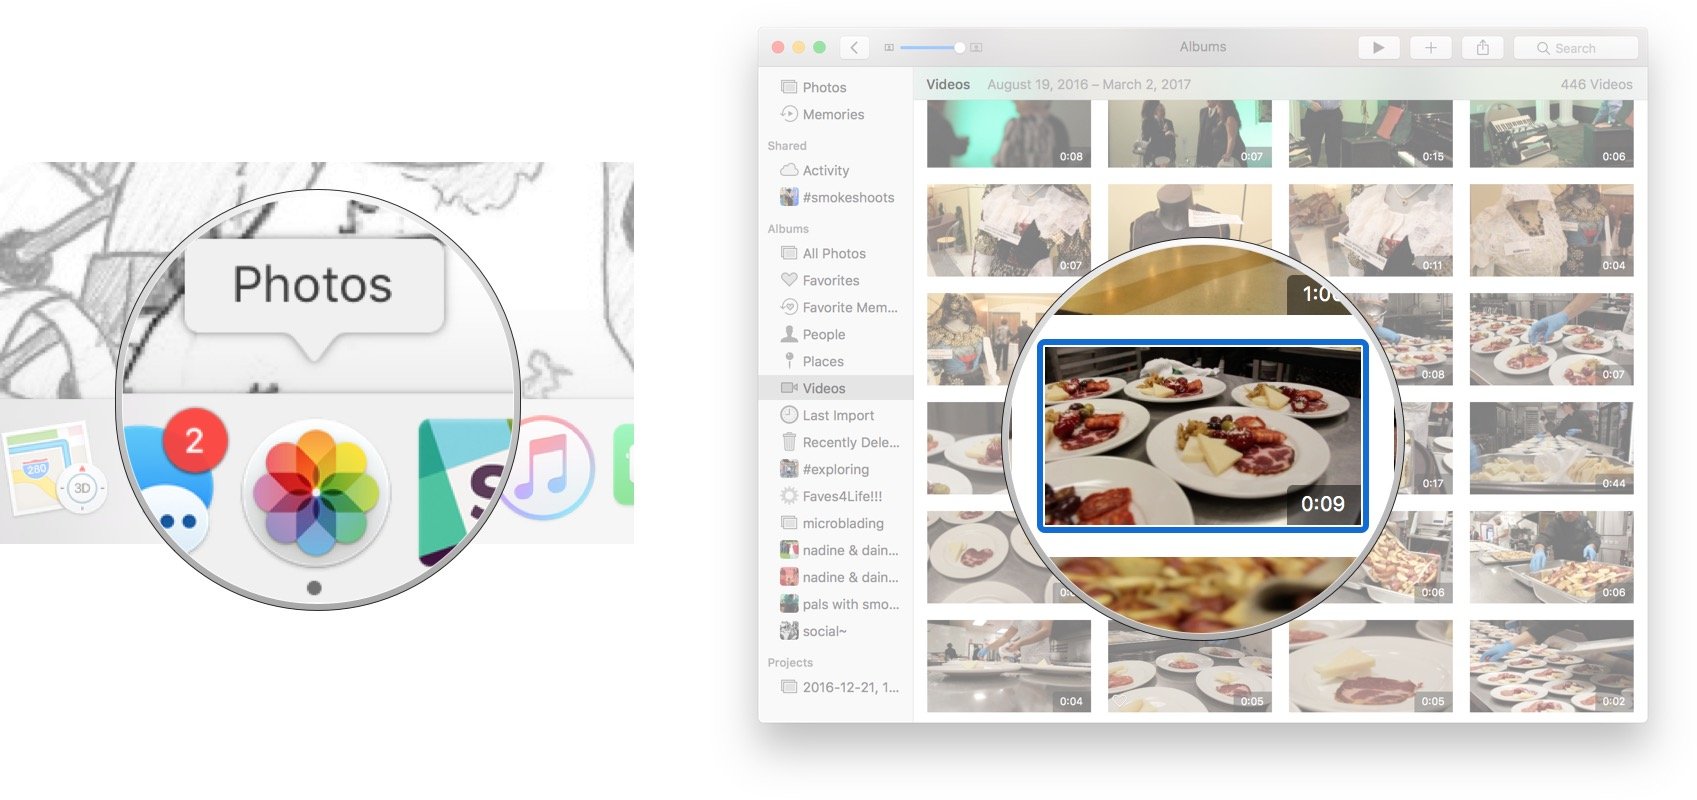
- Double-click on the video to hit it fill the Photos app.
-
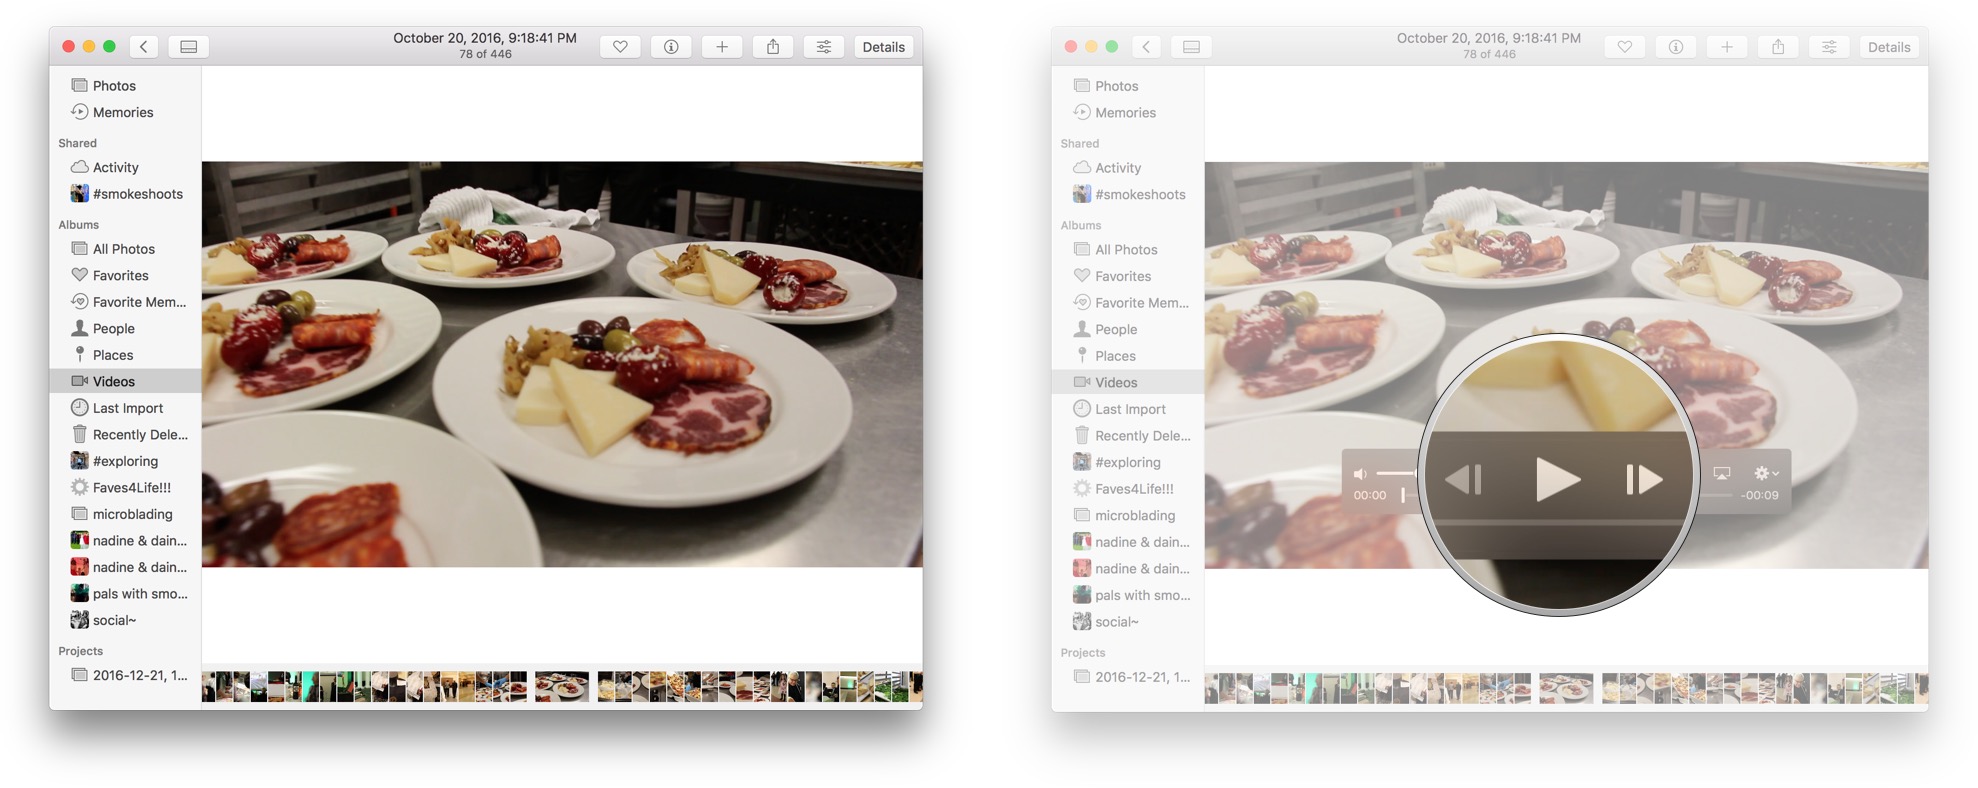
Loom your mouse over the video to bring out the control overlay.

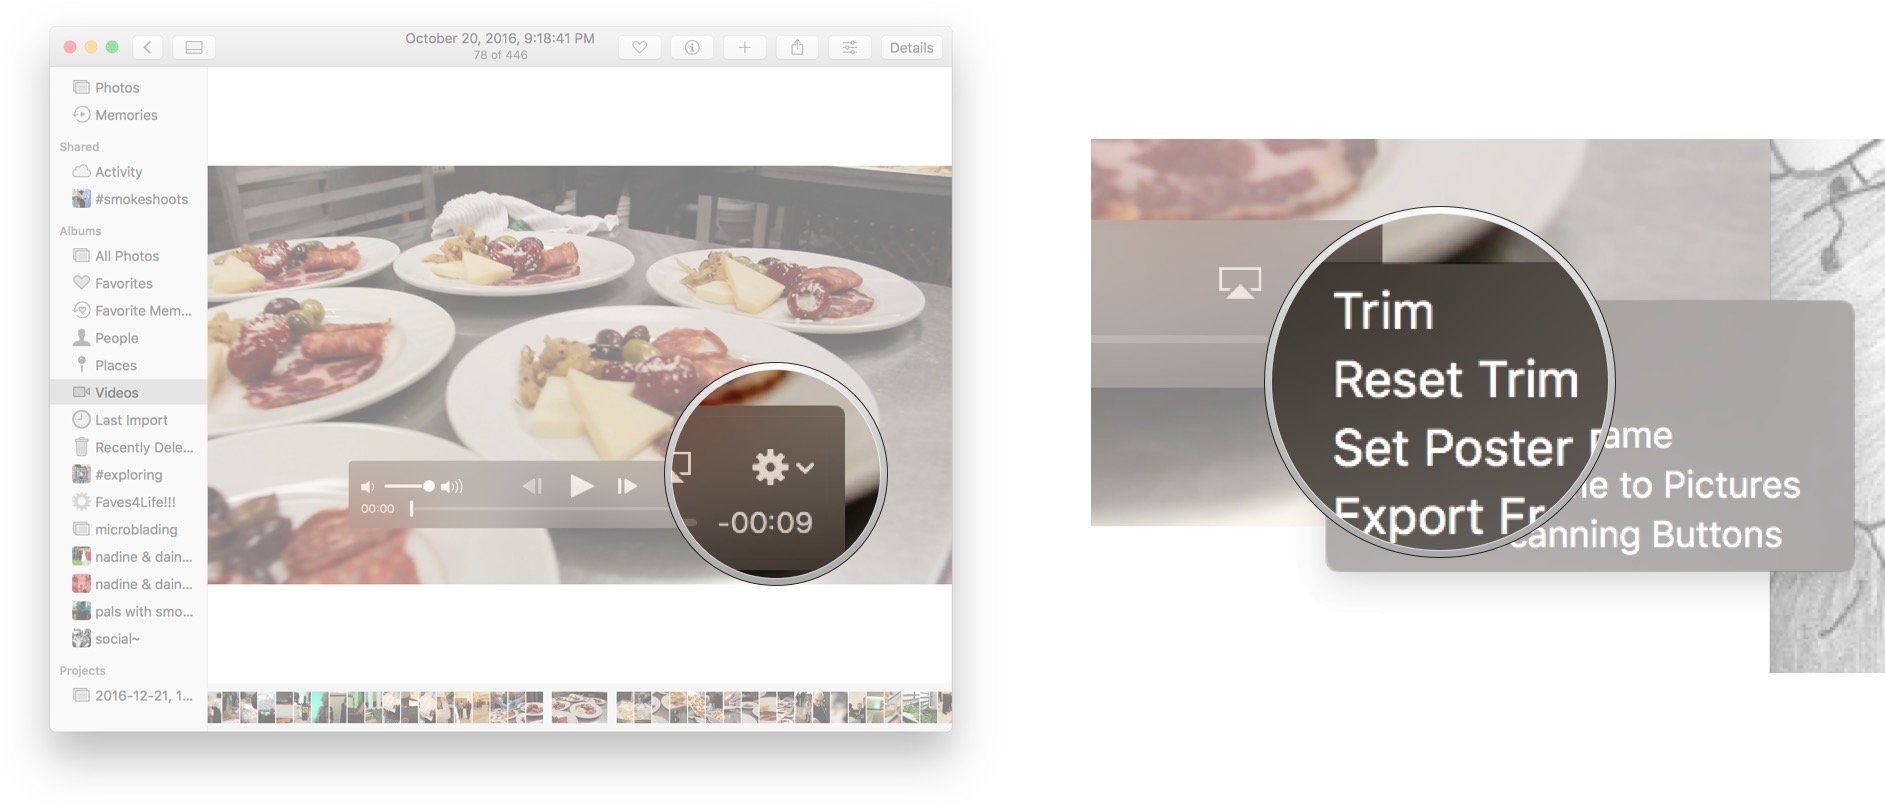
- Dawn on the geared wheel icon to show options.
-
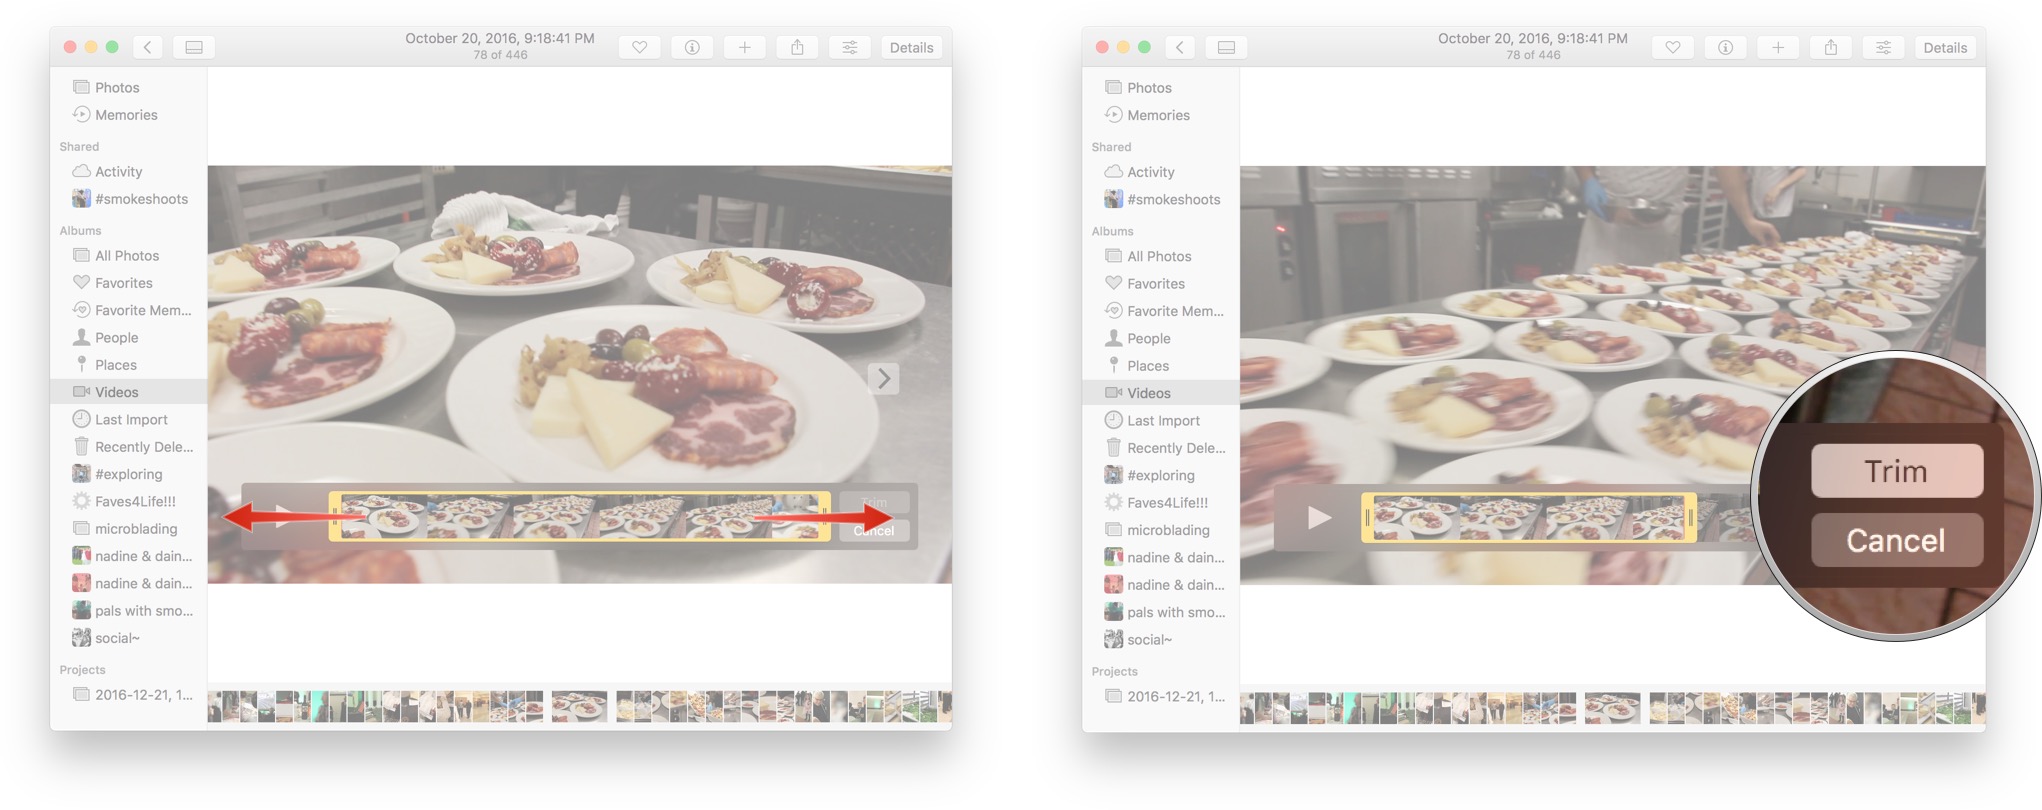
Click on Trim.
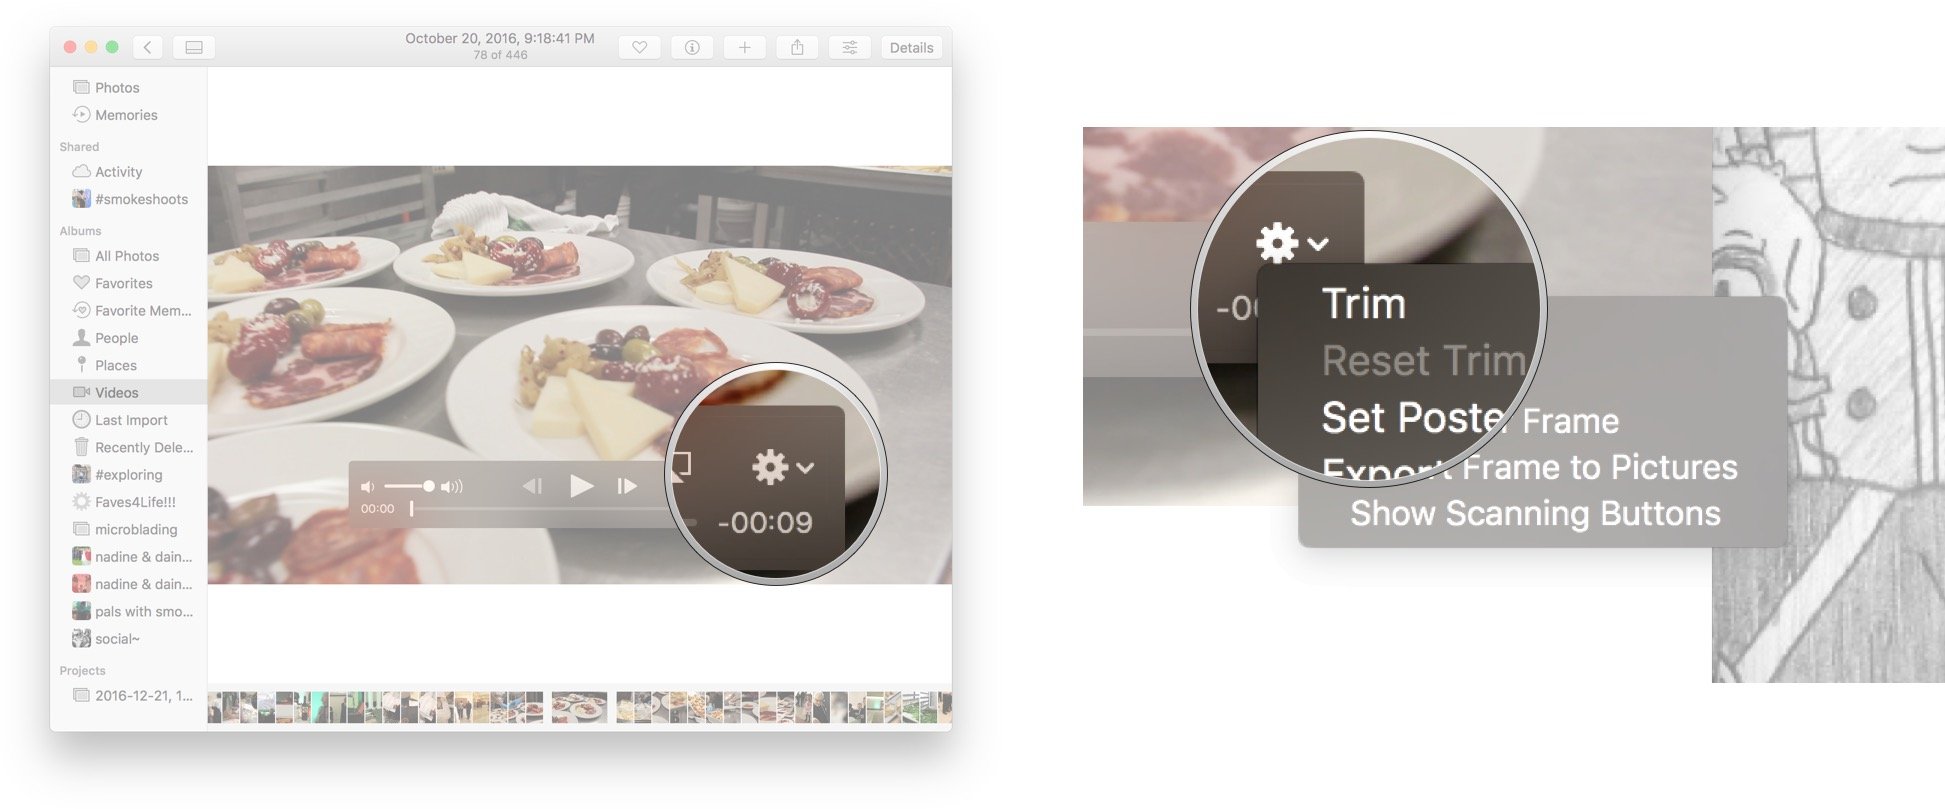
- Drag the yellow handles along either side to pare from the beginning or end of the video.
-
Click Trim to confirm the modify.


How to reset the passementerie on a video in Photos for Mackintosh
If you trim a video and later regret it, don't worry, the edit is non-destructive, and the germinal video can easy make up restored.
- Launch Photos on your Mac.
-
Find the video you want to turn back.

- Three-fold-click on the video to make it filling the Photos app.
-
Bulk large your sneak over the video to reveal the control overlay.
- Click on the gear icon to register options.
-
Cluck on Readjust Trim.


How to edit a video from Photos for Mac
If you deficiency to add transitions, titles, or other effects to your video, or if you want to disregard or mix up it up with other videos, you'll need to use iMovie.
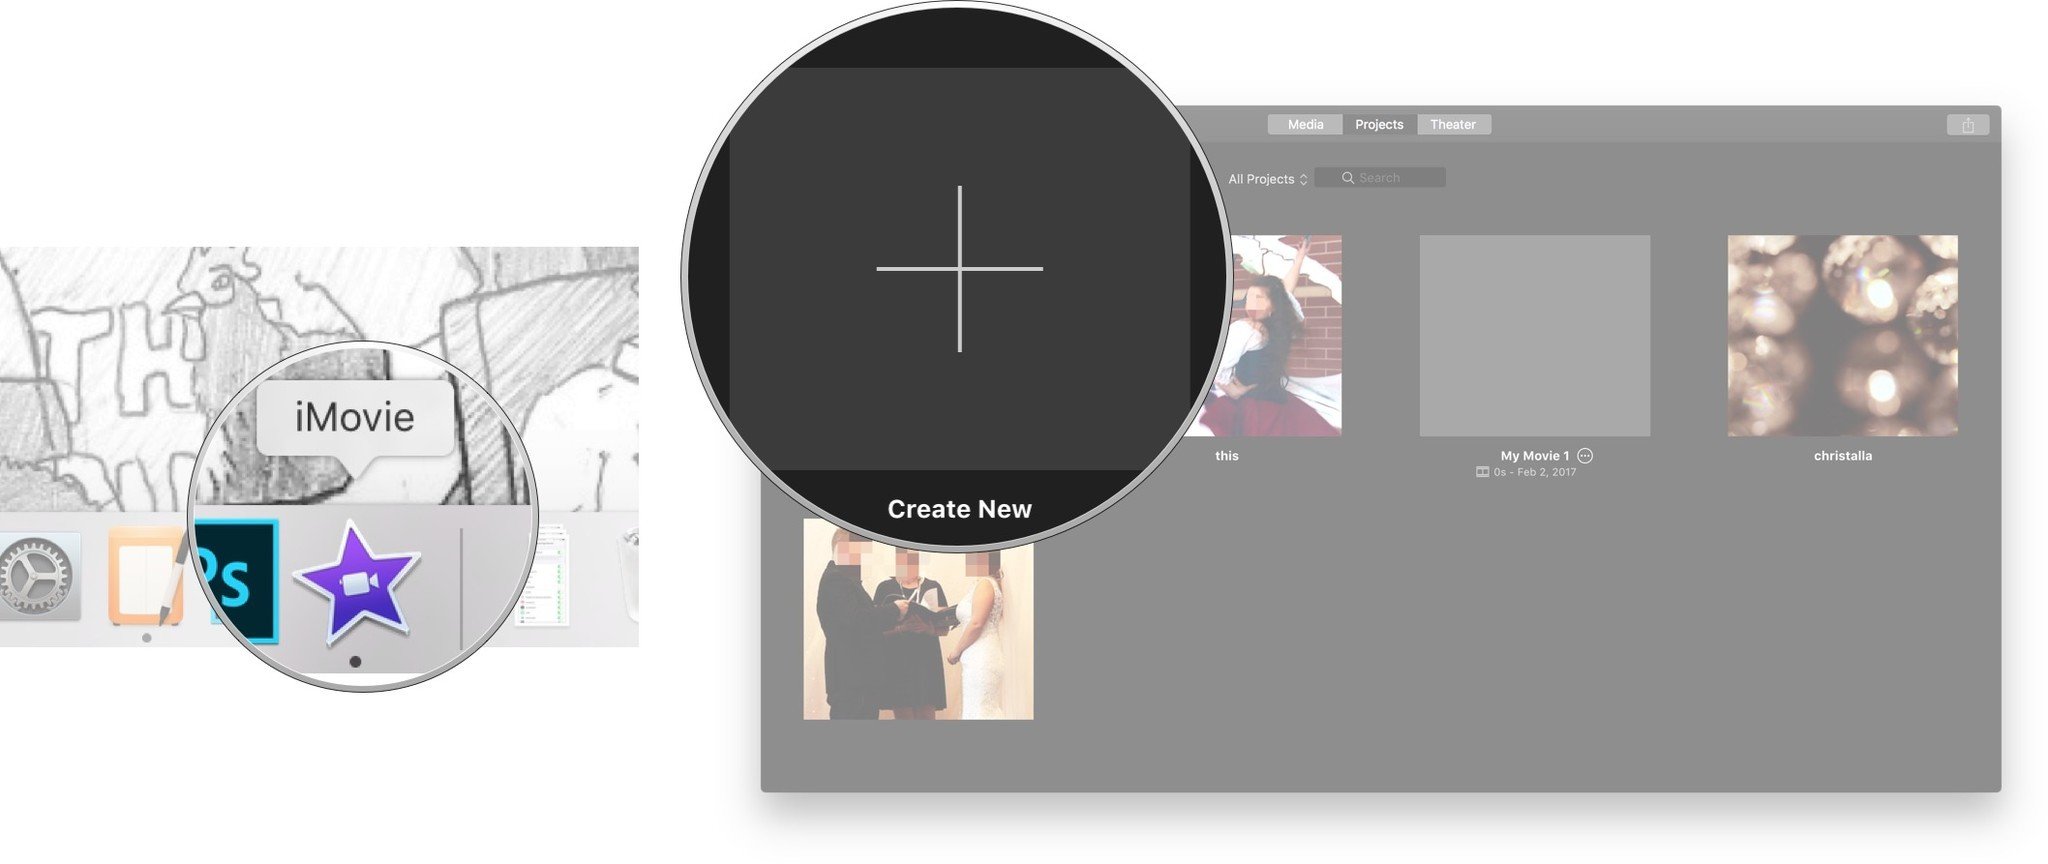
- Launch iMovie on your Mac.
-
Click Create Radical and select Picture.
- Click on Photos Program library in the sidebar.
-
Detect the video you wishing to edit.
- Click on the video to select it.
-
Fall into place on the + icon to add it to the clips in the current moving picture.


Then commencement editing away!
One time you're done, you rump share the video right from iMovie Beaver State carry through information technology out and sweep IT back into Photos for Mac for syncing and guardianship.
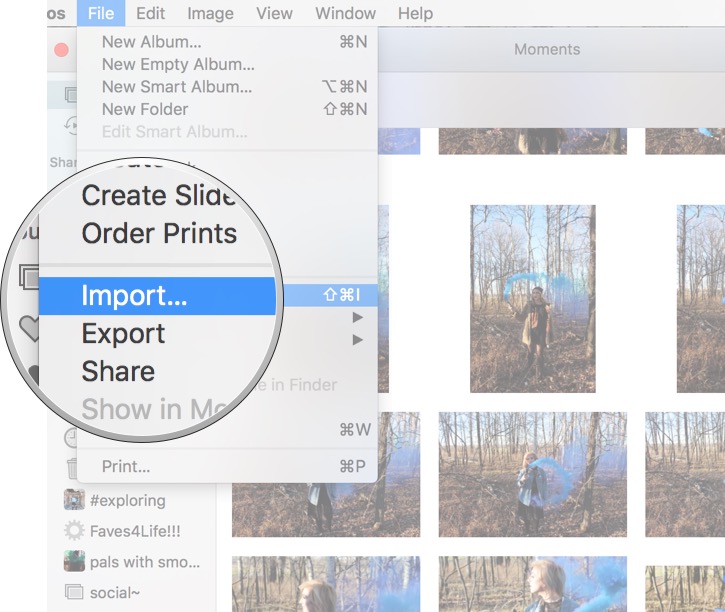
How to move an image unstylish of Photos and into Photoshop, Pixelmator, Acorn, operating theater other external editor
- Launch Photos from the dock or View finder.
- Click happening the photo you want to edit.
- Click on File.
- Pawl on Export
-
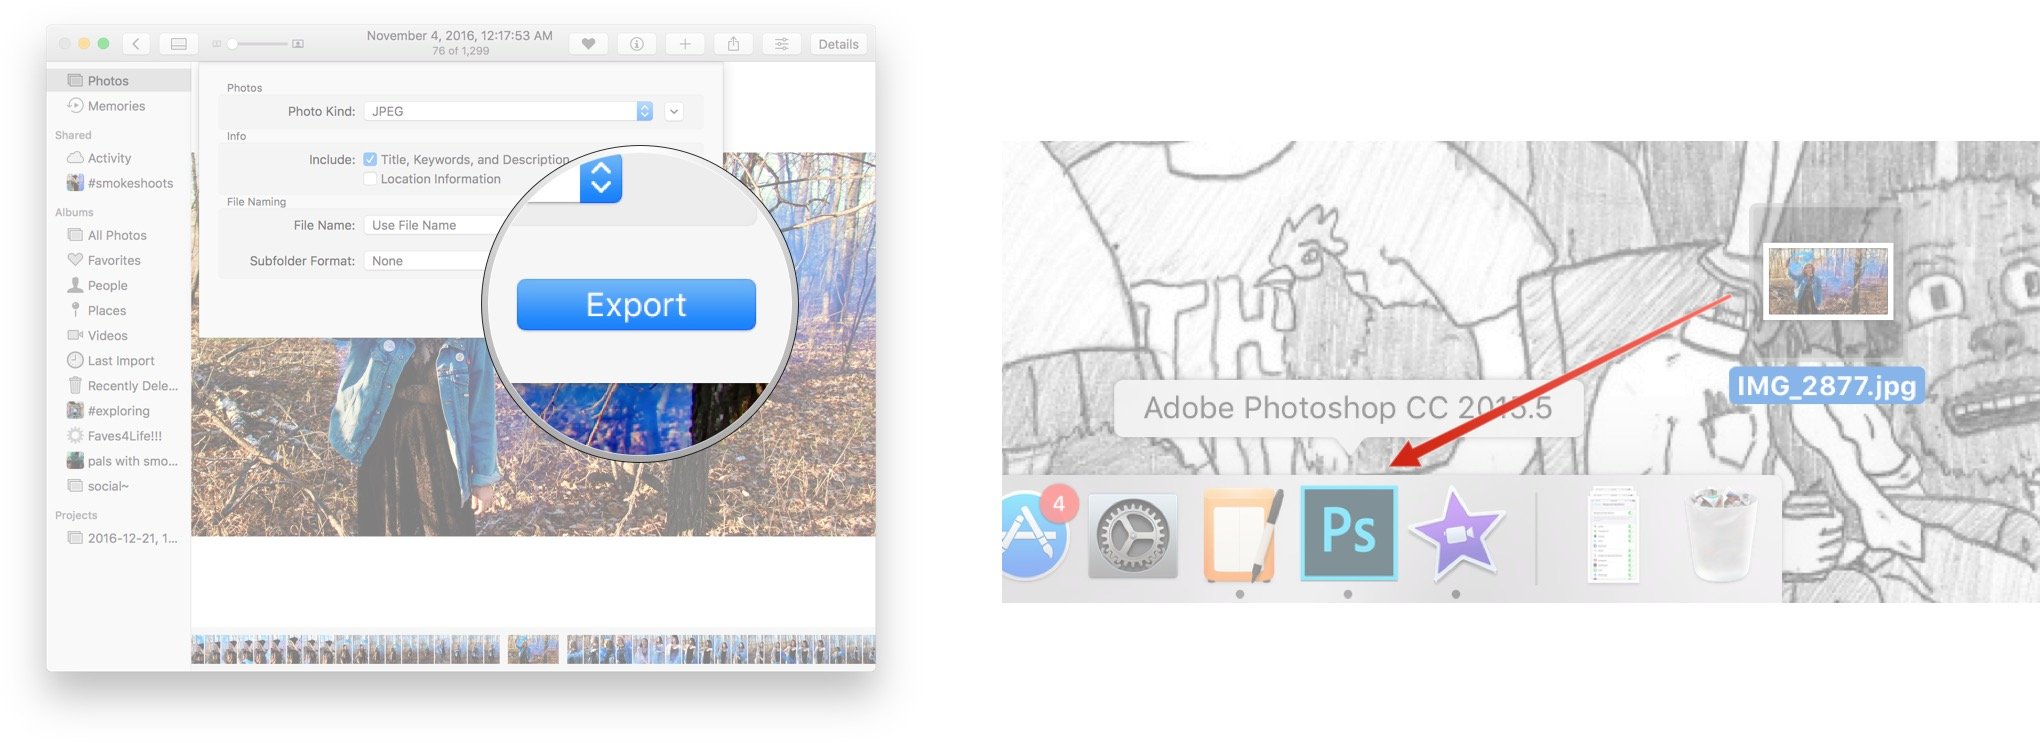
Click on Export Unmodified Original.
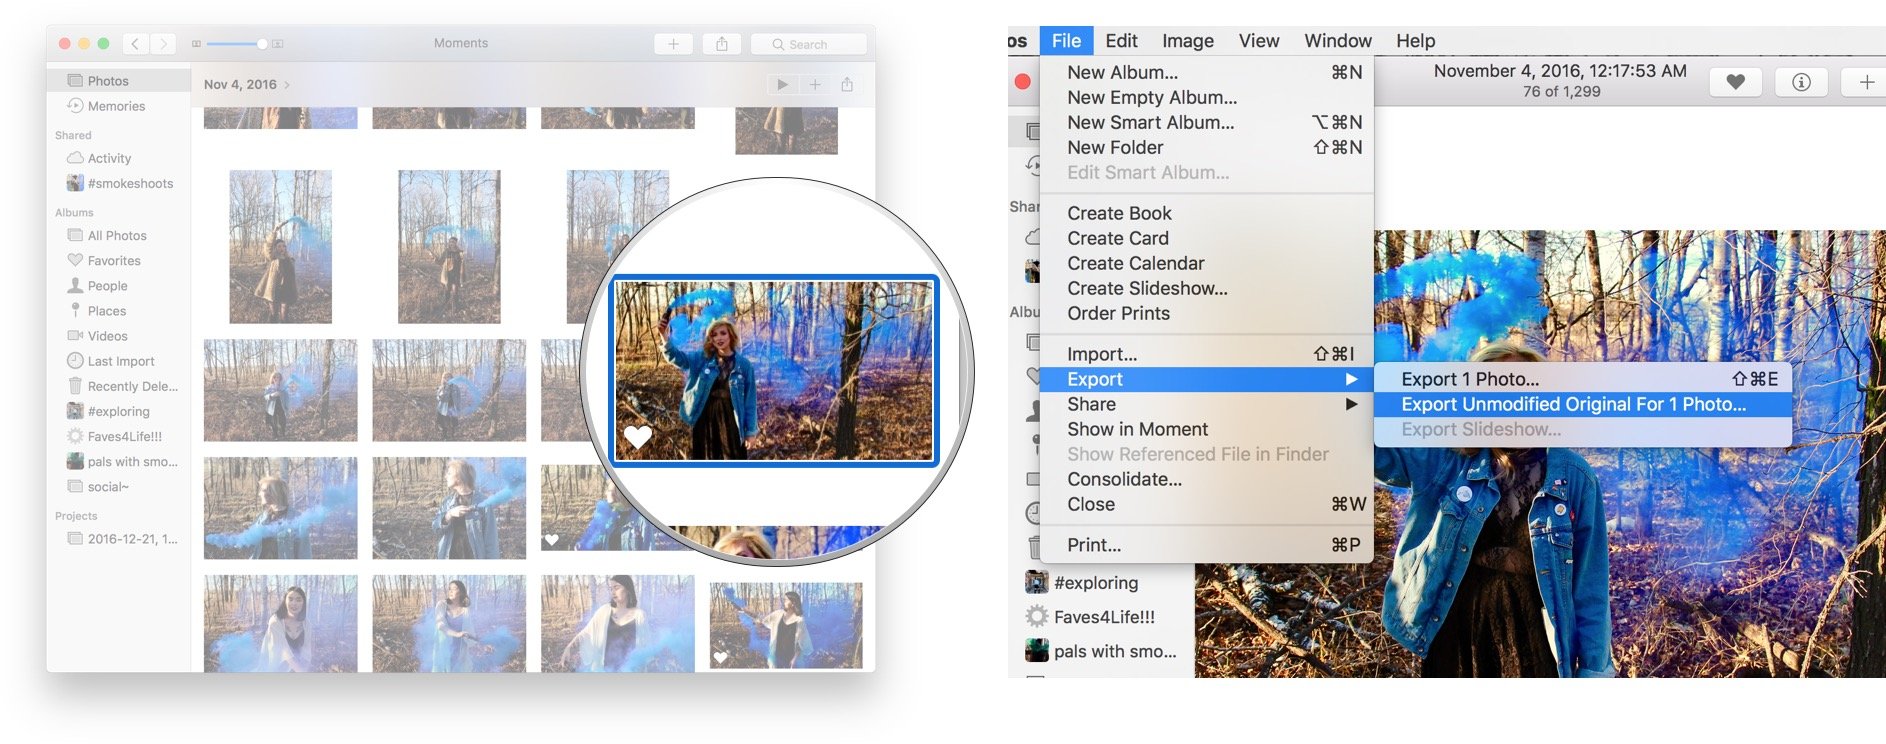
- Click Export after you filling out the photo information and choose where you would like to save it.
-
From your desktop, drag the photograph into your favorite image editor in chief. (Or control-right-get across the picture and prefer "Open with..." and then your favorite figure editor program.)


How to bring an edited figure back into Photos for Mac
- Make unnecessary or Export the edited image punt to your desktop from the exposure redaction app.
-
From your desktop, drag the image back into Photos for Mac (or choose the File > Import menu particular so select the image to moment.)

Questions?
Let us get it on in the comments below!
Updated March 2022: Updated for macOS Mohave.
Source: https://www.imore.com/how-edit-pictures-photos-mac

Posting Komentar